


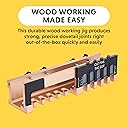


Dovetail Jig, 12-inch
Product ID: 2553355
Details
- ColorGold
- BrandGeneral Tools
- SizePack of 1
- MaterialAluminum
- Item Weight2.9 Pounds
📏12-inch precision template
🔩Adjustable clamping for any board width
⚙️Includes 14° dovetail router bit
Desertcart purchases this item on your behalf and handles shipping, customs, and support to Cape Verde.
🔨 Nail your next project with precision and style!
The General Tools 12" Woodworking Dovetail Jig is a professional-grade aluminum template kit designed for flawless dovetail joints. Featuring an adjustable clamping system that fits any board width and including a 14-degree, 1/2-inch dovetail router bit, it enables both novices and pros to craft strong, precise joints for furniture and cabinetry. Lightweight and portable, this jig eliminates the need for bench mounting, making it perfect for versatile indoor and outdoor woodworking projects.


| ASIN | B007E9IMP0 |
| Best Sellers Rank | #307,753 in Tools & Home Improvement ( See Top 100 in Tools & Home Improvement ) #768 in Power Tool Accessory Jigs |
| Color | Gold |
| Customer Reviews | 4.2 4.2 out of 5 stars (1,771) |
| Date First Available | January 7, 2011 |
| Included Components | (1) 861 Dovetail Jig & (1) 14-degree, 1/2 -inch dovetail router bit for use with hand table or table router |
| Item Package Quantity | 1 |
| Item Weight | 2.94 pounds |
| Item model number | 861 |
| Manufacturer | General Tools |
| Material | Aluminum |
| Number Of Pieces | 1 |
| Part Number | 861 |
| Power Source | Hand Powered |
| Product Dimensions | 12 x 3 x 3 inches |
| Size | Pack of 1 |
| Style | Modern |
| Warranty Description | Warranty |
R**N
A good product
An easy jig to use
C**R
Works well, with a small amount of practice on scrap. The provided bit isn't for very hard wood.
After 2-3 practices on cut off stock, It works well. Like any other tool, the more you use it, the better you get. When using harder stock than Walnut, like Purple Heart, when cutting pins be sure to listen to the router. That way you can hear when the bearing touches the plastic stop, as it's harder to "feel" when using very hard wood. I used a router table, which I'm sure produces better results. Very hard wood, like Wenge, and Purpleheart, is already prone to router and planer tear out. These woods are much harder than domestic hardwoods. The second photo shows Purpleheart and Wenge. I had some minor tear out on one of the Purpleheart tails. That was not the fault of the jig, but the nature of the type wood. A backer board would help. Domestic hardwoods work no problem. Through joints work ok, but don't come out perfect. Ensure the Pins board is cut using the EXACT thickness of the Tails board, like I didn't do. I finally got around to trying Edge-to Edge dovetails. They works well too.. The example is two edge-to-edge dovetails per box side (eight total), mitered, or beveled. It is the Quilted Maple with Leopard wood corners. I did find an issue with the provided bit. On harder wood, harder than Walnut like Purpleheart, or Bloodwood, the bit dulls even more rapidly. But more seriously, on harder wood, it can come loose in the collet. Initially, I thought it was my OEM collet. I bought a Whiteside collet, same thing. Later, I noticed the exposed shank, below the bearings, was shorter than my other ¼" shank bits. Anyway, I burned up the provided bit on the wine rack. Bottom line, the included bit sucks. I now use an Amana 14 degree ½" X ½" dovetail bit, and it works fine. But I guess that helps keep the package price down. I still love the jig, for the price. Edit: A backer board is a must for me now. I like to run a marking gauge lightly the height of tails of the tails on both sides prior to cut. That's just me.
A**R
Worked well with some reservations.
I bought this after searching for a mini dovetail jig. I was looking for a jig to cut small dovetails. This is more of a small jig to cut larger dovetails. However, although the instructions say that it works for material thickness of 1/2 inch and greater, I successfully cut through dovetails in material slightly less than 3/8 inch thick. I am done with that part of my project and may never have use for it again. If I were to use it a lot I would be concerned as the plastic pin guides are already showing some wear where the guide bearing rides against them. Speaking of guide bearing - make sure the set screw in the locking collar is good and tight. I used it with a small Menards trim router that I have - the trim router was a good match to this jig. The box with the included foam made it easy to store everything together when I put it away until who knows when.
R**.
Great tool for the price.
I am very happy with the jig. I have never made dovetails before, and I did not expect this to be something that I use to complete all of my joinery. I bought this to become familiar with this type of joint. The first try, I had to adjust the router bit down a tiny bit on the tails to make the joint fit, but very easy to set up and makes good joints. My only suggestion would be to purchase a better bit. After a few pieces of wood, this bit dulled and started causing major tear out. The bearings on this bit came apart very quickly, make sure you wear eye protection. I purchased a new bit at Lowes and already had plenty of bearings to keep my work moving. It is small, and if you are trying to create a larger joint, mark it out where you want the pins and tail. If you try to do a larger piece with numerous pins, you have to continually move the piece and re-align it to the jig. Other than that, I am more than satisfied. The next thing that I will add to this will be a backer board to minimize the tear out. I tried using a piece loosely with the jig, had to keep lining it up with the jig and the work piece. I will try to make a dedicated piece that is permanently attacked.
T**N
It's OK
Well made but of limited use. A bit fiddly if you're an old man like me
D**E
stroke victim
I have a Kreg router table with a Bosch 1617 router, and a Jess em Lift. Feud Bits and now my set up is complete with the General Dovetail and box joint jig. Works as advertised, Price is great and you tube videos also. A must have in the shop.
P**S
Does not work as advertised (or at all really)
I had to wait a week to write a review about this product so that I could come at this from a place of logic rather than anger. I bought this product with the intent of making box joints or dovetailing a box that I was making for my son's school group. For reference, I have been doing woodworking in my home shop for about 15 years and have made both box joints and dovetails by hand. I read other ratings and watched a couple videos and then bought the product thinking I was getting a well made item that would help me make dovetails much more quickly than I could do by hand. I was wrong. First I tried box joints. The packaged instructions claim box joints are a viable way to use this product...the instructions are wrong. I did not have a pattern bit handy so I figured I'd use the bearings off the dovetail bit that came with the product...warning- the bearings do not fit on the shafts of other 1/4" shaft drill bits...So I instead invested in a pattern drill bit at the store. I tried to make box joints on several practice pieces and they just would not line up...I tried 5 or 6 times and made a dusty mess to no avail. I looked for a video on line to see if anyone else had tried the box joints, but I could not find one...I guess that is because it doesn't work. As a side note, the instructions say you need to add a 1/4" shim to the front to make the box joints work...why isn't the shim included with the product?! Although, I guess that doesn't matter, because it isn't possible to line the joints up anyway. So, I regrouped and decided to go ahead with the dovetail joints...that's what the product is supposed to be best at, right? First off, the bit they give you with the package is not good. It is not sharp enough and after practicing with it several times one of the tines broke off the bottom. So, back to the store to buy another bit, this time a dovetail bit. The new bit (a Bosch) was great and the cuts were fairly clean, even in plywood. Only one problem now...the dovetails would not line up. No matter what I tried...raising the bit, lowering the bit, going slower, going faster, different routers, standing on one leg and chewing gum, you name it I tried it. I watched the on-line videos a couple more times...I have no idea what magic they used to make this thing "work" in the videos, but mine would not line up. I finally gave up and made cabinet joints on my table saw. I spent 7 hours of my life that I can never get back, $46 dollars on this product, another $40 on router bits I shouldn't have needed, and used up a whole lot of perfectly good scrap wood only to find that this product is flawed and does not work as advertised (and therefore not at all).
J**E
Very beginner friendly
Easy to use
S**O
Wenn man weiß, wie es geht, funktioniert es sehr gut und schnell!
Das Teil kommt in einer ordentlichen Verpackung und man sieht sofort, dass es für den amerikanischen Markt gemacht ist. Offenbar hat man im Laufe der Zeit auch immer wieder Kleinigkeiten verbessert, z.B. die Befestigungen für das Werkstück (sieht man in alten Videos). Es ist vollständig aus Metall (Aluminium) und ordentlich verarbeitet. Montiert werden muss nix. Man kann lediglich die beiden Griffe für die Arbeit am Frästisch anschrauben und muss sie wieder abschrauben, wenn man mit dem Fräskorb arbeitet. Bzgl. US-Produkt: Die Anleitung und das Video sind natürlich auf Englisch. Alle Angaben sind in Zoll (2,54 cm). Der beiliegende Fräskopf ist auch mit einem 1/4" (Zoll) Schaft - den legt man am besten gleich zur Seite, weil der sowieso nicht in eine Standard-Fräse für den deutschen Markt passt, und kauft einen mit 8 mm Schaft in besserer Qualität (gibt’s hier z.B. von ENT 16200). Man sollte sich schon mal einen Tag Zeit und diverse Probebrettchen nehmen, zusätzlich die Anleitung und das Video schauen, bevor man richtig loslegen kann. Es ist wirklich nicht schwer und macht richtig Spaß, wenn man den Dreh raus hat. Schwalbenschwänze erklärt das Video sehr gut. Das beschreibe ich hier nicht extra, werden aber ordentlich (s. 6. Foto) und halten auch. Bei den Zinkenfräsen braucht man wieder einen mit Kugellager am Schaft (Bündigfräser). Der Durchmesser muss genau 12,7 mm sein (1/2"), sonst fräst man zu viel oder zu wenig und die Zinken passen nicht. Er muss um die Länge der Werkstückdicke + Dicke der Zinkenschablone (ca. 7mm) + Zugabe (ca. 0,5mm) herausragen UND (das gilt auch für Schwalbenschwänze) dann immer noch mit dem einen Kugellager an der Zinkenschablone anliegen. Denn - aufpassen: Die Zinkenschablone hat nach hinten eine geringere Dicke (S. 3. Foto). Wenn man die Frästiefe nicht richtig einstellt, schrammt man gleich mit dem Fräserschaft an der Schablone entlang oder man rutscht ab! Das ist bei den Schwalbenschwänzen noch relativ einfach einzustellen, bei Zinken aber schon tricky, weil der Fräser dann nicht mehr lang genug ist. Ich habe mir so geholfen, dass ich das Werkstück weiter nach hinten und nach oben versetzt habe (s. 4. Foto) mit einem 12 mm Brett als Zwischenstück geht’s (es entsteht eine minimale Lücke, vermutlich 0,7 mm, ist aber nicht schlimm). Und dann bekommt man perfekte Zinken (s. 1. und 2. Foto mit Überstand und plan geschliffen - da war ich etwas hastig, ist ja nur zur Probe). Kurze Anleitung fürs Einstellen der Zinken: Erstes Brett einspannen und den Fräser an der linken Seite der Zinkenschablone entlang führen. Nur links! Wir wollen genau 12,7 mm oder 1/2" heraus fräsen. Zweites Brett dann an der rechten Seite der Zinkenschablone entlangführen. Markierung: Hat man das erste Brett gefräst, legt man beide bündig übereinander und zeichnet die Lücken vom ersten auf das zweite Brett. Dann markiere ich immer noch die Teile, die ich wegfräsen will (weil ich sonst unter Garantie die falschen Teile weg fräse) und stelle den rechten Rand der Markierung so ein, dass er bündig mit der Zinkenschablone verläuft (Ablauf, s. 5. Foto). Werkstück festspannen und wie oben erklärt an der rechten Seite entlang fräsen. Schaut man sich die Markierungen an, sieht das unlogisch aus, als ob zu wenig weggefräst wird - aber es funktioniert! Mit Fräskorb oder am Frästisch arbeiten? Ist eine Philosophie-Frage. Wenn man sich sicher genug fühlt ist die Frästisch-Methode sehr komfortabel, denn das Festspannen der Schablone wird schnell lästig. Beim Frästisch spannt man das Werkstück ein, dreht das Ganze um und legt los (Links und rechts auf der Unterseite markieren, sonst kommt man durcheinander). Außerdem fliegen die Späne nach hinten weg und können abgesaugt werden. Mit Fräskorb fliegen die einem immer ins Gesicht. Zinken und Schwalbenschwänze sitzen schon ohne Verkleben bombenfest und ich brauche einen (Schon-)Hammer, um die wieder auseinander zu bekommen. Also klare Kaufempfehlung und trotz der englischen Anleitung 5 Sterne, weil es mir gefällt, dass das Produkt komplett aus Metall gefertigt ist und sich mit dieser Farbe schon fast als Deko-Objekt anbietet!
A**O
Excelente!!
Boa ferramenta, muito funcional, e excelente acabamento!!
G**Y
General Tools Pro per Dovetailer II a Coda di Rondine ...
La dima si presenta quasi interamente in alluminio e acciaio con alcune parti in plastica dura. Nella confezione è presente una fresa a coda di rondine larga 1/2 pollice e 14 gradi, purtroppo l’articolo nasce per il mercato nordamericano e tutti i riferimenti sono in unità Imperiali (pollici) e al momento le ,prove che ho realizzato sono state tutte con riferimenti in “pollici”. Ho acquistato la dima per poterla utilizzare con il mio tavolo di fresatura ma potrebbe bene essere utilizzata anche con una fresatrice a mano portatile, con la tavola da incidere fissata a un piano di lavoro e la dima fissata all’elemento da fresare. PRO: - Prezzo ragionevole: circa 1/4 del costo delle maschere di marca. - Può essere utilizzato su un tavolo di fresatura: la mia fresatrice (Bosch POF 1400 ACE) è grande e un po' difficile da maneggiare tenendola a mano. Ma ancora non ho provato con il rifilatore più piccolo della Makita. - È possibile inserire tavole per la lavorazione di qualsiasi larghezza: la forma della dima consente di tagliare 5 code/perni alla volta e poi far scorrere la tavola nella maschera per tagliarne di più assecondo delle necessità. - C'è un pezzo di plastica scorrevole con 2 funzioni: come calibro per impostare l'altezza della punta della fresatrice (aggiungere 1/2 pollice per accogliere la maschera), quindi impostare la profondità della fessura del perno (aggiungendo ancora 1/2 pollice). Anche se è utile avere questo misuratore multiuso, è meno conveniente di avendo 2 calibri. - A corredo della dima viene fornito un OTTIMO manuale utente che, passo passo e con numerosi esempi, introduce all'uso corretto della dima. Consiglio una attenta lettura del manuale prima di iniziare le vari prove. CONTRO: - Il manuale è in Inglese, Spagnolo e Francese. - Il pezzo di plastica scorrevole (almeno sul mio articolo) sedeva un po' orgoglioso del corpo in alluminio, il che faceva sì che i tagli dei perni fossero un po' più superficiali dei tagli della coda. I miei giunti di prova iniziali erano sempre allentati e non riuscivo a capirne il motivo finché non ho notato questo problema. Sono riuscito a rimediare al problema staccando il pezzo di plastica, quindi levigandone la parte anteriore con una levigatrice manuale e carta a grana 120, quindi riattaccandolo al corpo in alluminio. Ciò non ha influito negativamente sul misuratore di profondità/altezza regolabile. Questo è qualcosa che il produttore dovrebbero risolvere. - La punta della fresa fornita con la maschera aveva 2 problemi: continuava a bruciare il legno e l'altezza della lama era leggermente inferiore al 1/2 pollice, il che mi impediva di ottenere giunzioni strette. Ho comprato una nuova punta Freud che ha risolto entrambi i problemi. Avrei preferito acquistare la maschera senza punta a un prezzo leggermente inferiore. GIUDIZIO COMPLESSIVO: sono riuscito a utilizzare con successo la maschera per realizzare 2 scatole a cassetti alte circa 14 cm, anche se con modifiche alla maschera e alla punta della fresa (come indicato sopra). Ho intenzione di costruire più cassetti in futuro e continuerò a utilizzare questa maschera.
R**I
Great Dovetail Jig Works as described
I have had a few different dovetail jigs, but this is the easiest to use and most accurate. I could recommend it to anyone from hobbiest to journeyman.
C**N
The manual can be confusing. Look on YouTube for better directions.
Great tool! Perfect for dove tails and half blind dove tails.
Trustpilot
1 month ago
1 week ago